Tuesday, July 5, 2011

Lovely Cell Phone Cozies

Hello friends!

How are you doing? I hope you all had a great weekend. Thanks you very much for your nice words on my last posts also. It's a while I haven't been here and I miss blogging so!  That's great to have something to blog again! :)

A friend of mine told me she loved a cozy for her new cell phone, so I made these small stuff to surprise her on her birthday. I took these pictures a week ago but so busy to post.
 
I made this one using star stitch pattern from Teresa (video tutorial here). I love the stitch and the pattern so much, I used to make one when I had just learned to crochet, by following instructions from her, it turned out not too bad, hehe! But I can feel the difference with this one!

And this one is my own pattern, with a combination between puff stitch and double crochet, the next round were front post single crochet and repeated, it came out ever so lovely!

Both of them were given to my friend as a birthday gift, she texted me "I love them so much did you know!", I was happy too!

They covered and fitted the cell phone perfectly!
and lovely!
I will make some more for myself and friends, cozies are always really fun to make!

Thank you for stopping by, I wish your new week is wonderful and cheerful!!!

Until next time! x

Sunday, June 26, 2011

Another Ridge Hat With Brim


Happy Sunday everyone!

I finished this hat last week but was so busy to take photos and post, well, how time flies, it's weekend again and I'm happy to have something to share with you all!


It was made with the same pattern as the one I made before for my Mom (pattern can be found here). I wanted to try it with another type of yarn and hook size, so I used Lion Brand Cotton Ease, Seaspray color and size G-6 4.25mm, bigger than the one I used in my original pattern. I adjusted stitches and shells a bit as I used a larger hook: 6 rounds for top and 8 shells for hat body. The brim was done exactly what the pattern says. It turned out as lovely as I expected!


Such a nice idea to make a sun hat for this summer, I love this hat, the color is so lovely! It also has a softy touch and so comfy to wear under the sun!


Have a happy Sunday everyone, I wish your summer is gorgeous and enjoyable!

~ Thank you for stopping by and see you soon !

Monday, June 13, 2011

Knitting WIP - My Stripped Scarf Is Done!


Hello! Hello Friends,

Thank you very much for all your comments in my last post, that's so SWEET and means a lot to me! I would love to THANK YOU, thank you for the amazing bloggy friendship!

Remember my first knitting project WIP in the beginning of this year? Oh I can't believe it's over six months! The scarf WIP has been in my closet for months then! Finally I managed myself to get it done (phewww!!!), and here is how it turned out:

I knitted in the rounds with 5.0mm circular needles, worsted weight yarn, 60 inch long (not including the fringes).

I love the softy touch and the warm feeling as it was knitted in rounds. Take a closely look when it's folded:

This scarf will be a handmade gift for my honey's sister in July, she is living in a very cold place. I love it, so warm and happy to wear, hope it will make her warm too!

Sorry for uploading so many photos for one scarf, I'm so exciting and just love to enjoy pretty pictures of my knitting achievement here! Oh I have to say knitting is really another inspiration to me! :)

That's all for this post, wish you all a gorgeous new week ahead!!!

See you later!

Tuesday, June 7, 2011

Hat of the Month!


Hi everyone!

Just popping by to say Hello, hope you all had a great weekend!

I received a notice yesterday from the Hat of the Month group on Ravelry and I would love to share you all here: My Ridge Hat with Brim pattern has been voted for The Hat of the Month for a crochet-along for June! Such an earburning news to me!

I would like to express my big thanks to all of you who have brought me all the motivation and encouragement so far! This is my first attempt on designing a pattern and like a magic, it's over my expectation! I'm so thrilled!!!

Thank you! Wish you all a wonderful week ahead!

Lovestitch, xo

Monday, May 30, 2011

My First Sewing Project: Knitting Needle Roll


Hello friends, hope your weekend was wonderful and enjoyable, filled with joy, happiness and so many crafty creations to amaze me!

I'm so excited now as I am going to show you my FIRST sewing project, which I've dreamed on for a long time: Sewing knitting needle roll!

Using this great tutorial as a guide, I modified a bit and here is my own one:
Not yet many things to put in the case as I've just taught myself how to knit, but it will be great to keep all my knitting tools for the next future :).

Single point needles, circular needles, double points, cable needles and other tools are all in order, very neat.

Needles and other stuff, just some but such a mess before:

They now have an ideal home! So comfy! So happy!

Isn't it lovely? I will spend more time to keep going in knitting, as promised to myself. Also have many crochet projects in waiting, but I've found sewing is really fun too! :). Oh my... how much time is enough for doing all things I love to do? Well, I should take it easy...

Have a gorgeous week ahead everyone!!!

See you soon, x

Sunday, May 29, 2011

Free Pattern: Crochet Catherine Wheel Tissue Box Cover


Hi everyone, here is the pattern for my crocheted Catherine Wheel Tissue Box Cover mentioned last post.

Sorry for not writing the pattern and posting it soon as promised.  Some of you have asked for the pattern and I'm glad to get it done today to share you all. Let me know if there's any mistake found.

Crochet hook: 3.25mm, cotton yarn of your choice.
Ch 38, join with slip stitch to the first chain to form a circle. 
  • Round 1: ch 1, sc in the same stitch, 1 sc in each chain around. Join.
  • Round 2: ch 1, sc in the same stitch, 1 sc in each of the next 18 stitches, 3 sc in the next stitch, 1 sc in each of the next 18 stitches, 2 sc in the next stitch, join with slip stitch to the first sc (42 sc in total).
  • Round 3: ch 1, sc in the same stitch, 3 sc in the next stitch, 1 sc in each of the next 18 stitches, 3 sc in the next stitch, sc in the next stitch, 3 sc in the next stitch, 1 sc in each of the next 18 stitches, 3 sc in the next stitch, join with slip sitch to the first sc. (50 sc in total)
  • Round 4: ch 1, sc in the same stitch, sc in the next stitch, 3 sc in the next stitch, 1 sc in each of the next 20 stitches, 3 sc in the next stitch, 1 sc in each of the next 3 stitches, 3 sc in the next stitch, 1 sc in each of the next 20 stitches, 3 sc in the next stitch, 1 sc in the next stitch, join with slip stitch to the first sc. (58 sc in total)
  • Round 5: ch 1, sc in the same stitch, 2 sc in each of the next 2 stitches, 3 sc in the next stitch, 1 sc in each of the next 22 stitches, 3 sc in the next stitch, 1 sc in each of the next 5 stitches, 3 sc in the next stitch, 1 sc in each of the next 22 stitches, 3 sc in the next stitch, 2 sc in each of the next 2 stitches, join with slip stitch to the first sc. (66 sc in total)
  • Round 6: ch 1, sc in the same stitch, 3 sc in each of the next 3 stitches, 3 sc in the next stitch, 1 sc in each of the next 24 stitches, 3 sc in the next stitch, 1 sc in each of the next 7 stitches, 3 sc in the next stitch, 1 sc in each of the next 24 stitches, 3 sc in the next stitch, 3 sc in each of the next 3 stitches, join with slip stitch to the first sc. (74 sc in total)coners
Continue with the same increasing rule (to create the corners) for the remaining rounds till round 11:
  • Round 7: 82 sc in total
  • Round 8: 90 sc in total
  • Round 9: 98 sc in total
  • Round 10: 106 sc in total
  • Round 11: 114 sc in total
  • Round 12: Ch 1, sc in the same stitch, *skip 2 stitch, 7 dc in the next stitch, skip 3 stitches, sc in the next stitch. Repeat from * to the last 2 shells. (Skip 3 stitches, 7 dc in the next stitch, skip 3 stitches, sc in the next stitch) twice. Join with slip stitch to the first sc. (16 shells in total)
  • Round 13:  Slip stitch to the 4th dc, ch 1, sc in the same stitch, *ch 3, work 1 cluster over next 7 stitches, ch 3, sc in the next stitch. Repeat from * to end. Join with slip stitch to the first sc. (16 clusters in total)
  • Round 14: Ch 1, sc in the same stitch, *skip 3 ch, work 7 dc into the loop which closed next cluster, skip 3 ch, sc in the next sc. Repeat from * till end. (16 shells in total)
  • Round 15: Slip stitch to the 4th dc, ch 1, sc in the same stitch, *ch 3, work 1 cluster over next 7 stitches, ch 3, sc in the next stitch. Repeat from * to end. Join with slip stitch to the first sc. (16 clusters in total)
Repeat rounds 14 and 15 for the remaining depth of your tissue box.

Picot edging: Join new yarn in any stitch, * ch 3, slip stitch to the first ch (make picot), ch 2. Repeat from * to the remaining stitches to create lovely edging for your tissue box cover.

~ Enjoy!

Saturday, May 28, 2011

Crochet Little Bear Coasters


Hello Hello everyone!

Thank you so much for your sharing and your comments on my last posts, I'm happy to have you here! 

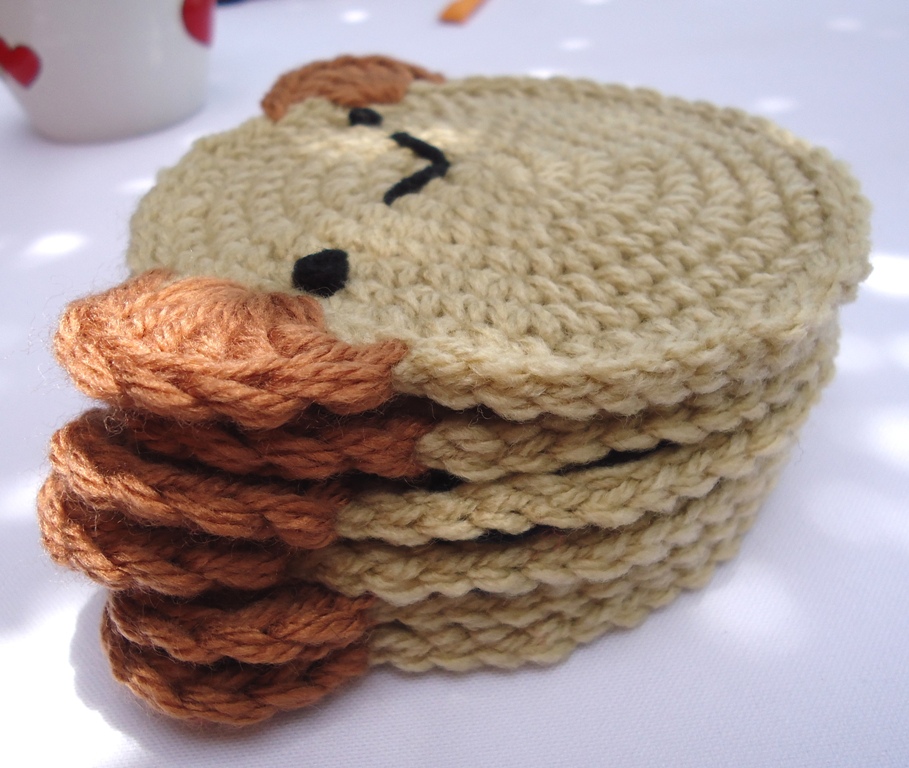
Well, today I feel great and have something little to share you, I've just made some coasters, they're easy and so fun to make!
Stack them up
You would like the pattern? You got it right here:

Face: 
Magic circle,
Round 1: Ch 1, 8 sc in the loop. Do not join.
Round 2: 2 sc in each sc around (16 sc). Mark the first sc with a contrasting color maker.
Round 3: 1 sc in the next stitch, 2 sc in the next stitch (24 sc)
Round 4: sc increase in every 3 stitches (30 sc)
Round 5: sc increase in every 4 stitches (36 sc)
Round 6: sc increase in every 5 stitches (42 sc)
Round 7: sc increase in every 6 stitches (48 sc) 
Round 8: sc increase in every 7 stitches (54 sc)
Skip 1 stitch, slip stitch to the next stitch to join. Slip stitch all around the circle to make it stronger.
Ears: 
Join new yarn in any stitch of the circle, ch 1, skip 2 sc, make 6 dc in the next stitch, ch 1, skip 2 sc, slip stitch to the next stitch to join. Fasten off and weave all the yarn tails.
Count to the next 10 stitches, make the same ear for your coaster. 
Use French knot for the eyes and sew to form the mouth in any way you like. 

You are done! It's time to take one for your sweet cup!

♥ Have a happy weekend everyone!

Tuesday, May 24, 2011

Thursday, May 12, 2011

Crochet Scarf With Galaxy Stitch


I've just finished this scarf for my Uncle, using Galaxy stitch. Video tutorial HERE.


From more than two skeins of this yarn.

I love the color, love the stitch pattern, and love how happy my Uncle looked when I gave it to him!

Happy day to you all!

Tuesday, May 3, 2011

Crochet Catherine Wheel Tissue Box Cover


Hello everyone! Hope you all had a wonderful weekend!

I just finished this tissue box cover and must say I'm pretty pleased with it, can't wait to show you here! I love the softy cotton touch, the Catherine Wheel look and the cheery colors as well.


Take a look from the top:

This tissue box cover fixes a tissue box with 4.0"D x 6.5"L x 4.2"H, like this one:
 
After dressed:


This is my own design and I'm very pleased to share my pattern with you. So if you like it, just come back, I will write and post the pattern very soon!

Enjoy your new week and see you later! x

Friday, April 29, 2011

Just Lovely Things...


... love this little birdie...

and a little flower and leaf...
 

also love this little bowl ...

love how it keeps the bobbins safe in shells...

but this lovely one also does its job well...

... just simple things, but my heart feels lovely...
 

Hope everyone enjoy a SWEET and LOVELY weekend!

Sunday, April 24, 2011

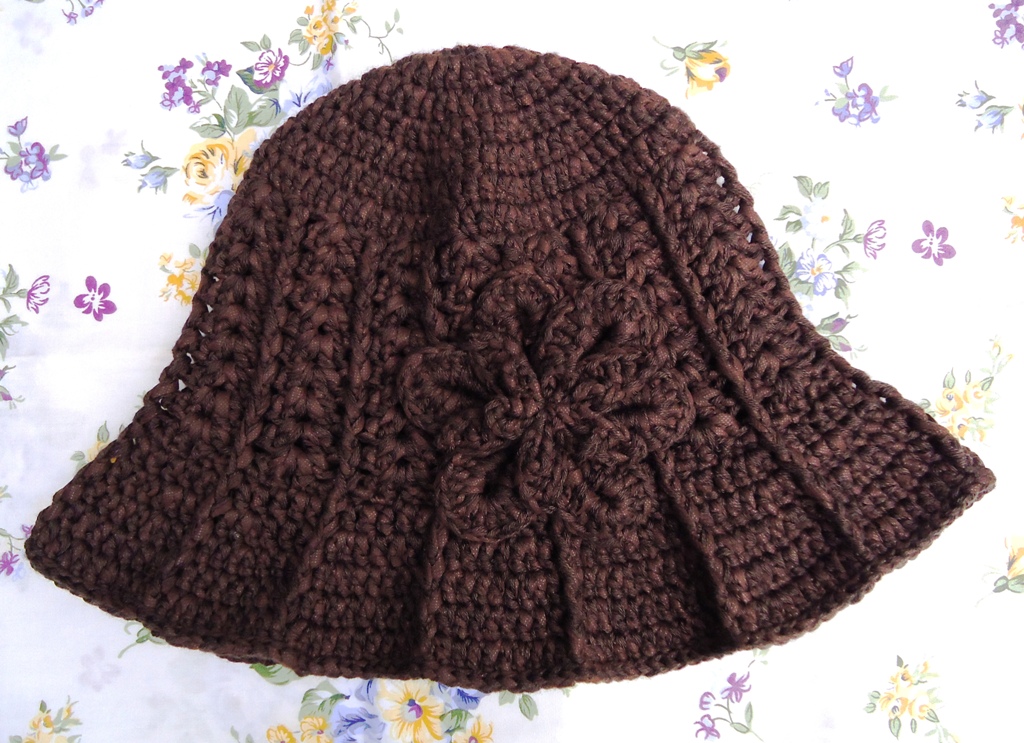
Pattern For My Ridge Hat With Brim

Hi everyone,

Thanks a bunch for making my day with your so sweet and lovely comments on my hat last post. Some of you have wondered if I could share the pattern, honestly I didn't write it down when I were making, so I tried to write it down here in case you would like to use. Please feel free to let me know if there's any mistake.


With size F (3.75mm) crochet hook and some cotton (or any kind of yarn as you wish), make a Magic circle.

Flat circle for the top:
  • Round 1: Ch 3 (count as the first dc), 11 dc in loop. Join with slip stitch to the beginning chain 3 (12 dc)
  • Round 2: 2 dc in each stitch around (24 dc)
  • Round 3: *1 dc in the next stitch, 2 dc in the next stitch. Continue around from *. Join (36 dc)
  • Round 4: *1 dc in each of the next 2 stitches, 2 dc in the next stitch. Continue around from *. Join (48 dc)
  • Round 5: *1 dc in each of the next 3 stitches, 2 dc in the next stitch. Continue around from *.Join (60 dc)
  • Round 6: *1 dc in each of the next 4 stitches, 2 dc in the next stitch. Continue around from *. Join (72 dc)
  • Round 7: *1 dc in each of the next 5 stitches, 2 dc in the next stitch. Continue around from *. Join (84 dc)
Hat body:
  • Round 1: Ch 3 (count as the first dc), * skip 2 stitches, work 2 dc in the next stitch, chain 1, 2 dc in the same stitch (this will form a shell). Skip 2 stitches, dc in the next stitch. Continue from * for the remainder of the round. Join with slip stitch to the beginning chain 3 (14 shells in total) 
  • Round 2: Ch 1, Front Post Single Crochet (FPSC) around the previous chain-3, chain 1 (count as the first FPDC). * Skip 2 stitches, 2 dc in the next ch-1 space, chain 1, 2 dc in the same stitch to complete a shell. Skip 2 stitches, work 1 Front Post Double Crochet (FPDC) around the previous dc. Continue around from * for the remainder. Join to the chain 1 right above the first FPSC. (You will have total of 14 shells and 14 FPDC between each shell).
  • Repeat round 2 for the next 9 rounds. Join with slip stitch to the first FPDC. 
  • (This will straighten the shells) Ch 1, FPSC around the previous stitch, * hdc in the next stitch, sc in the next stitch, slip stitch to the chain-1 space, sc in the next stitch, hdc in the next stitch, FPDC around the previous FPDC. Continue around from * for the remainder. Join (84 stitches in total)
Ridge brim:
Note: make a FPDC instead of a dc around every previous FPDC. This will create the ridges for your brim.
  • Round 1: Ch 1, FPSC around the previous stitch, ch 1, 1 dc in each of the next 2 stitches, 2 dc in the next stitch (make an increase). * 1 dc in each of the next 3 stitches, 2 dc in the next stitch. Continue from *. Join (105 dc in total)
  • Round 2: Ch 1, FPSC around the previous stitch, ch 1, 1 dc in each of the next 3 stitches, 2 dc in the next stitch (make an increase). * 1 dc in each of the next 4 stitches, 2 dc in the next stitch. Continue from *. (126 dc)
  • Round 3: Ch 1, FPSC around the previous stitch, ch 1, 1 dc in each stitches around. (126 dc)
  • Round 4: Ch 1, FPSC around the previous stitch, ch 1, 1 dc in each of the next 4 stitches, 2 dc in the next stitch (make an increase). * 1 dc in each of the next 5 stitches, 2 dc in the next stitch. Continue from *. (147 dc) 
  • Round 5: Ch 1, FPSC around the previous stitch, ch 1, 1 dc in each stitches around. (147 dc)
 Slip stitch (or reverse sc) all around to make the brim stronger.

Update:

FLOWER PATTERN
This flower has three layers, three particular flowers are stacked from big to small.

The flower with big petals:
Make a magic circle,
  • Round 1: Chain 3 (count as a dc), ch 1, dc in the loop, ch 9, join with slip stitch to the first chain, ch 1. *dc, ch 1, dc, ch 9, join with slip stitch to the first chain, ch 1. Repeat from * 4 times. Join with slip stitch to the first ch-3 (12 dc and ch-1 space; 6 ch-9 loops in total).
  • Round 2: Ch 1, sc in the same stitch, * work 14 dc in the ch-9 loop, sc in the next dc. Repeat from * 5 times, join with slip stitch to the first sc. Fasten off.
The smaller one:
Magic circle. Ch 1, * sc in the loop, ch 6, 1 hdc in the third chain from hook, 1 dc in each of the next 3 stitches. Repeat from * 5 times, join with slip stitch to the first sc (6 petals in total). Fasten off.

The smallest one:
Magic circle, * ch 8, slip stitch in the loop. Repeat from * 4 times (5 petals in total). Fasten off

Assembling:

Put these flowers in order they should be done with the smallest one on top. Sew in place in the center. Sew it in the hat using the photo in my blog as a guide, if you like making it that way. :)

Pattern PDF link: download free pattern on Ravelry now


♥ HAPPY EASTER to EVERYONE!!! ♥ 

Tuesday, April 19, 2011

My Mom Has Another Hat!


I always love making something for my Mom, something sometimes is very simple but special, just as it comes from my heart and I make it myself! Nothing is greater than a handmade one don't you think? So this time, again I crocheted her another hat! :)


I've just made it with some yarn left and it's my very own one, come with no pattern. I played around with some stitches and finally I decided to make one like this. Love how it turned out, love the stitches I've done, and love how it fits my Mom also!

Thank you soooooo much for your visit and your sweet words on my posts so far, they really made my day, to be honest!

Take good care everyone, hope you have a gorgeous week!

See you very soon!!! x

Friday, April 15, 2011

Crochet Brimmed Cap


I had a lot of fun when this brimmed cap was done! This is the first time I made such a cap and it turned out over my expectation! I'm soooo excited to show you here! :)


Look from the top:
 Do you notice a button on top? I'm so happy with this little cute one! :)
Pattern for the cap is from a Japanese book and in chart form, but it's very easy to make. Just come over here to get it if you are interested in.

Have a very happy weekend everyone!!! x

Tuesday, April 12, 2011

Cheerful Tissue Box Cover

Hello friends! How are you? Hope your weekend was GREAT and your new week will be WONDERFUL!

Time goes by so fast, it's a while since my last post and how I miss blogging! I would also love to say THANK YOU for all your nice words so far, that means a lot to me. I do appreciate!

Don't you think this tissue box cover is lovely? I love this pattern right away I first saw it and now it's time to have one for my own. See how cute it is in my garden:

A look from top. Do you notice the edging? I made some picots instead of shell like the pattern says and it turned out lovelier than I thought!
Come over here for this lovely pattern if you are wondering where it is. Thank you Michelle for the great work!

Take care and see you very soon! x