Showing posts with label Crochet Granny Square. Show all posts

Saturday, August 4, 2012

~ Grass and Flowers Crochet Bag


Hello everyone! I am very happy you like the dotty square pattern on my last post. Thank you for all your sweet comments and compliments. I really appreciate! I made 24 squares and here is what I turned them into: a granny bag! Some of you guessed I would make a blanket - that's a lovely idea for my next projects! :)


This bag actually was done, packed and sent to the birthday girl on July 31, but I was unwell and too busy the last few days to post about it. I made the same bag a while ago, with solid granny square pattern and different type of yarn. I'm still using it and love it.


I worked very hard on the lining for this bag. My previous one doesn't have a zipper so I'm afraid to carry important personal stuff like a wallet or so. This time I managed to sew a zipper to secure the bag, and a small zipper for the small inside pocket too.


Even this little piece to hold one end of the zipper took me a lot of effort - sew and unsew - again and again until I got pleased with it.


A look from top with the zipper closed:

I named this bag "Grass and Flowers", as I love the "green grass" look when it was all joined together, the dots in center of each square and the lining fabric are beautiful flowers that I really liked. The only thing is, it no longer stayed with me!


Thank you so much for dropping in. Wishing you all a gorgeous weekend!!!

~ See you soon! ♥

Tuesday, July 24, 2012

Dotty Solid Granny Squares


I'm making a gift for my sweetie's niece, her Birthday is coming up on July 31. I wanted to make something special for her and finally ended up with these granny squares:


This is a modification of Solid granny square pattern that you may all know. I wanted it to have a dotty look so I made a small round in the center instead of a small square as the original pattern. I had to rip out and start again several times until I was pleased with the result as pictured.

Written pattern of Solid granny square can be found HERE, and HERE is for those who prefer crochet chart. Below is how mine looks - My "Dotty Solid Granny Square":


In case you are wondering, I have written down the modification and am happy to share you right here.

Make a magic circle or chain 6 and join to form a ring.

Round 1: Chain 3 (count as a dc), 19 dc into the loop. Join with slip stitch to the first ch-3 (20 dc).


Round 2: Join new yarn (mine is with a secure knot).


You will work in the stitch next to joining stitch, i.e on the right hand of the first ch 3 (as you will work 4 dc into the same stitch so working in this stitch will be easier than working right in the stitch of joining).


Chain 5, 2 dc into the same stitch, dc in each of the next 4 stitches, * (2dc, ch 2, 2 dc) in the next stitch, dc in each of the next 4 stitches. Repeat from * 2 times more, dc in the next stitch. Join with a slip stitch to the 3rd chain of the first ch 5.

Round 3: From this round and moving forward, using the Solid granny square pattern above until you get the desired measurement. I made a chain 3 at the corners instead of chain 2 as the pattern says. So here goes the round 3:

Chain 3, (2 dc, ch 3, 2 dc) in the ch-2 space, dc in each of the next 8 stitches. Repeat from * 2 times more, (2 dc, ch 3, 2 dc) in the ch-2 space, dc in each of the next 7 stitches. Join with a slip stitch to the first ch 3.

I have made 24 dotty squares, they came out beautiful! What are they for? I will show you once it's finished! It's a surprise!! :)

Thank you for stopping by. Also thank you so much for your kind comments on my posts so far. That means a lot, a lot to me.

Wishing you all a great rest of the week!

Take care and best wishes,
~ LS

Thursday, July 19, 2012

~ Sunburst Granny Square


Have you ever seen a square like this before? I was so inspired when I first saw it and couldn't help myself trying it right away! It came out so beautiful! It also has a cheerful name: "Sunburst Granny Square"!


You can find how to make it HERE. This is very fast, easy and fun to make! Go and check out the site, you may love other pretty patterns offered for free!


I just intended to try the pattern so see how it comes out. But after I finished the first square, I just couldn't stop, so I made one more, just one more,..., and I have 4 for the first try! I need to keep working on my current granny square blanket and other WIPs, so I will save this pattern for a baby blanket I'm going to make when my first blanket is all done. Making granny squares is so addicted, isn't it? ;)


Thank you for stopping by. Wishing everyone a happy day!! ♥

~ Till next time, x

Monday, July 16, 2012

~ Simple Pin Cushion with a Granny Square


I made a few pin cushions like this before and love them. I just thought it would be lovely to share if any one of you like it as well and would want to make...


So here is how it's done:

Sew a tiny pillow with a scarp of fabric, it's about 2.5 inch square. Stuff it with some polyfill or some unused yarn like mine. Either will do.

As I'm working on my Flower Blanket so I made a square with the same pattern. You can make any pattern of square that you like. This one is an 5 inch square.

Turn the wrong side up and place the small pillow on like this:

Fold all 4 sides toward the center...

And sew seams across.

Turn your work. You have done a pin cushion with a granny square! Another way to make pin cushion. Super easy just in 5 minutes! Simple but still lovely.

Pin me!

Small, neat and pretty pin cushion...

Hope you find this helpful in some way.

Thank you for stopping by.

You have a great week ahead! x

Friday, June 29, 2012

~ Tie a secure knot to join new yarn

Hello everyone!

Thank you very much for all your sweet comments on my last post. That's really a great motivation to me!

When making those granny squares for my blanket, I had an idea to make a tutorial on how to tie a secure knot to join new yarn color in a new round. In my beginning days of crochet, I often worked with the new yarn a few stitches, then turned the work and tied the new yarn tail with the old one in the back. I found it quite took time and but still kept working that way until I learned the easy but very effective way to tie a secure knot that I would love to share you in my post today. 

There are so many ways to tie a knot as well as to join new yarn. I found this saves much time especially when you have to change many colors for your work. This may be familiar to many crocheters, but I hope it's helpful to someone who is new to crochet or looking for a better way to tie a knot for joining yarn like I was before.

Okay, let's start. You have finished the first round:
 

Make a slip knot in the new yarn.

Wrap the old yarn over the hook and pull it through the slip knot.

Like this:

Slide the slip knot close to the first stitch.

Tighten the slip knot by holding two ends of the new yarn and pull tightly.

You have made a secure knot and ready to work with new yarn color.

It looks quite long with the detailed photos of demonstration, in fact this happens just within 1/10 second! :) Just keep going with your new yarn and weave all tails later on.

I love working with colors and was so happy to find my favorite way to tie a secure knot. I do the same with knitting too, and other things that need to be tied together...


Thank you for stopping by, I hope you all have a great weekend ahead - it's almost Friday today!!

~ Love and hugs, LS ~

Tuesday, June 26, 2012

BIG Project Started!


It's a granny square blanket. My first REALLY BIG project.

I have dreamed of a granny square blanket for a couple of years. I tried some granny square patterns before but not for blanket. It's so BIG and may take me years to finish... But I'm terribly inspired by so many talented ladies making their blankets, from ripples, squares, to hexagons, flowers,..., they are all adorable! So, took a deep breath (just as I was so excited! :)), I was headed to the craft store over the weekend and took home some more lovely yarns:


I decided to use the granny square pattern from Lucy at Attic24. It's so beautiful and caught my heart right  the first time I saw it. But it's most wonderful when I'm making it myself! Oh my Gosh, if only I know how amazing to make these sooner!

How cute to start from these lovely circles:

to bigger ones...

... turn them to these squares...

...from bigger and hot one...

and cooler one...

...to these!!! Here is how my blanket looks when it's finished! I've not yet counted how many squares for my blanket in total, it must be a lot!!! Well, still have a lot of work ahead, but attractive work, don't you think so?! :)


The more making these granny squares, the more I get addicted! I just love to take this basket when I get home from work every day! Happiness comes from just such little things!!!


Thank you all my bloggy friends for your time and words of encouragement always, you know how much it means to me!! ♥

I hope you are enjoying the beautiful rest of the week!

~ Much love, LS ~

P.S: I just realized I did post a drafted post (I fell asleep in front of my computer last night, urrrgh...) but you are so kind to leave such sweet comments. I just completed this and am so sorry for the silly confusion!

Friday, December 24, 2010

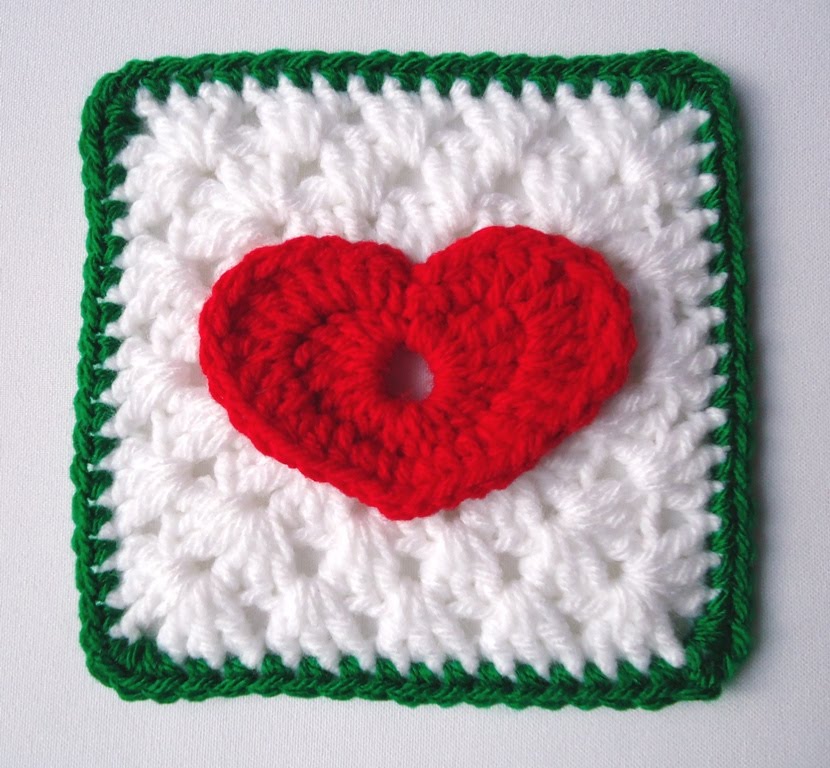
Crochet Christmas Heart Granny Square

I found the pattern of this heart square by accident and love it, so I made one with christmassy colors and share you here. Hope you like it! For the pattern, come here.

Merry Christmas!!!

Monday, August 30, 2010

Crochet Granny Squares: WIP

Above are some granny squares I have crocheted for my "A Granny A Day" plan. The more I make them, the more I love, so much, very much, nearly be addicted...! :) I always try to make one a day for my different projects (but sometimes I did not, hix), and now it becomes my WIP project (ah yes, for those who wondered: WIP = Work In Progress).I also have a plan of joining them. A granny-bag first, and then a blanket with shell edging, and perhaps something else, any plan can be changed, who knows! But you see, they are cool, although they are spread out or stacked, aren't they?
The pattern for these grannies comes from Attic24, she made a great tutorial for this. I also love the other patterns of hexagons and ripples... Once visit her blog, you will see a rainbow! Thanks for sharing, Lucy!

Monday, July 19, 2010

Crochet Fashionable Bag

Once reading an instruction for a fashionable bag on a crochet magazine (borrowed from a friend and I cannot remember its name), I know I have to make one for my own. It's a combination of solid granny squares with 4 different colors, and the design is really attractive!

This really is a great idea to start my "A Granny A Day" plan, so I began with a very excited feeling! The result is load of solid squares like this:


Then I joined them together in the way like this, put handles on, sewed lining and here is my complete bag:

Opened with the lining inside:

I think maybe you want to know how to make it, so I tried to write down what I have done in case you need, hope it's useful for you.

Instruction for the bag:

You need to make 24 motifs (6 motifs in one color), each motif is about 9.5-10cm.
Size F 3.75mm crochet hook.
Cotton yarn is for your choice, as long as it reaches your gauge.
A pair of bag handles: you can order from your local store.
  • Motif pattern and instruction: you can find here (thanks Teresa).
  • Joining to form a bag:
Follow this diagram and use the yarn color which you choose as main color of your bag to join motifs together to form a bag (for my bag it is green).

With wrong side facing, work a row of sc along edges, work each sc through front loops only on both edges. Dash lines on diagram are where motifs folded and joined to both front and back to form side and bottom seams.

Note:
Do not join the outside edges of the top 4 motifs on both sides as this a bag opening.

With right side facing and your main color yarn, work sc in each stitch along the outside edges of the top motifs on the bag. Weave all ends.

Must say, I love this bag soooooooooo much!!! Just wanna bring it with me all my way! :)